First thing to do when setting up any plane is to set up transmitter to output 1000-2000 us pulses, with 1500 us at the mid-position. Then set all the servos to their respective mid-positions. The servo horn should then be perpendicular to the housing (within 1 tooth snap of the horn), except for the servos for the flaps, if applicable. Those last ones will generally be at the flaps up position.
 |
| The left servo horn could maybe be turned clockwise by one click |
This ensures equal control surface deflections in either direction when anything else than mid-range is output, and symmetrical deflections of the control horns, and therewith control surfaces, w.r.t. the mid position.
 |
| Aileron pushrod |
 |
| Flaps servo |
The next thing is to align control surfaces by adjusting push rod length. For the flaps, the adjustment should be done in the flaps up position, ensuring that the servo does not make a buzzing sound, while the flap surface is as good as possible in line with the wing surface. The mid- and end positions then follow from that.
 |
| Aileron surface aligned |
 |
| Flap surface aligned as good as possible |
 |
| Elevator neutral position |
 |
| Rudder neutral |
I have chosen to use an
FrSky S8R receiver, because it adds stabilzer capabilities. Not that that should be necessary (the design of the airplane should be inherantly stable). But I want to see if and how that works. It took some effort to get it bound (see
my previous post), but once binding was achieved, all went smooth from there on.
First thing to do with the receiver bound and the servos and pushrods properly adjusted is to make sure the control surfaces move in the correct direction. This is the moment to reverse any channel in your transmitter to make sure they move in the correct direction with stabilization mode switched to off.
This receiver has a self-test and calibration function, that can be activated throug a switch assigned to channel 12 by default. Flicking that channel to the mid position and out of it three times within three seconds activates the function. It will move all control surfaces that are influenced by the stabilization function, after which those need to be moved to their extremes. This initial twitching sets the mid-positions, the moving of the ailerons, elevator, and rudder tells the receiver the extremes for those channels. Moving the throttle up is said to end the calibration, but waiting for about 5 seconds doing nothing works too.
So after the receiver self-test and calibration, it's time to check the correction directions of the stabilizer. If any of the corrections needs to be reversed, that must be done though the LUA script that comes with the SD card contents download of OpenTX, and not through the settings of the transmitter's mixer. Reversing a channel in the transmitter at this stage will make your plane react opposite when stabilisation is off. So reversing stabilization reactions should be done in the LUA script. The script also allows for tweaking any offset and gain values, but let's leave those default until some actual flying has taken place.
If the LUA scripts are not in your SD card content (folder SxR as it also applies to the
S6R receiver), you may need to upgrade to a newer openTX version. I am using OpenTX 2.2.3 at the moment of writing this.
The final pre-flight test is a range test of this transmitter / receiver set-up.
 |
| Receiver antenna configuration |
I had the antennas pop out of the receiver hatch as shown in the picture. Like this, they are at an almost perpendicular angle to each other, which should be helpful with dividing the polarity of the signal between them.
 |
| Tundra on the patio table |
I put the plane on the outside table next to our caravan, like shown above.
 |
| RSSI 100 starting out |
RSSI was very strong, on the ledge of the terrace.
 |
| "Telemetry critical" in range test mode |
This is where the first "telemetry critical" warning came, when in bind mode. As you can see, this was still pretty much line of sight.
The distance was only 33 meters, which would indicate a range of 330 meters. I thought that was a little dissappointing. I had expected more from this receiver. But since it is only a few hundred meters, I could easily walk the distance while transmitting in normal mode, and make an actual measurement.
 |
| "Telemetry critical" in regular mode |
 |
| Max range |
This time, the "Telemetry critical" warning came at 268 m, so the range being in the order of magnitude of 300 meters seems about right. Note that this was no longer truely line of sight, with trees, caravans, and a bit of a hill in between transmitter and receiver.
 |
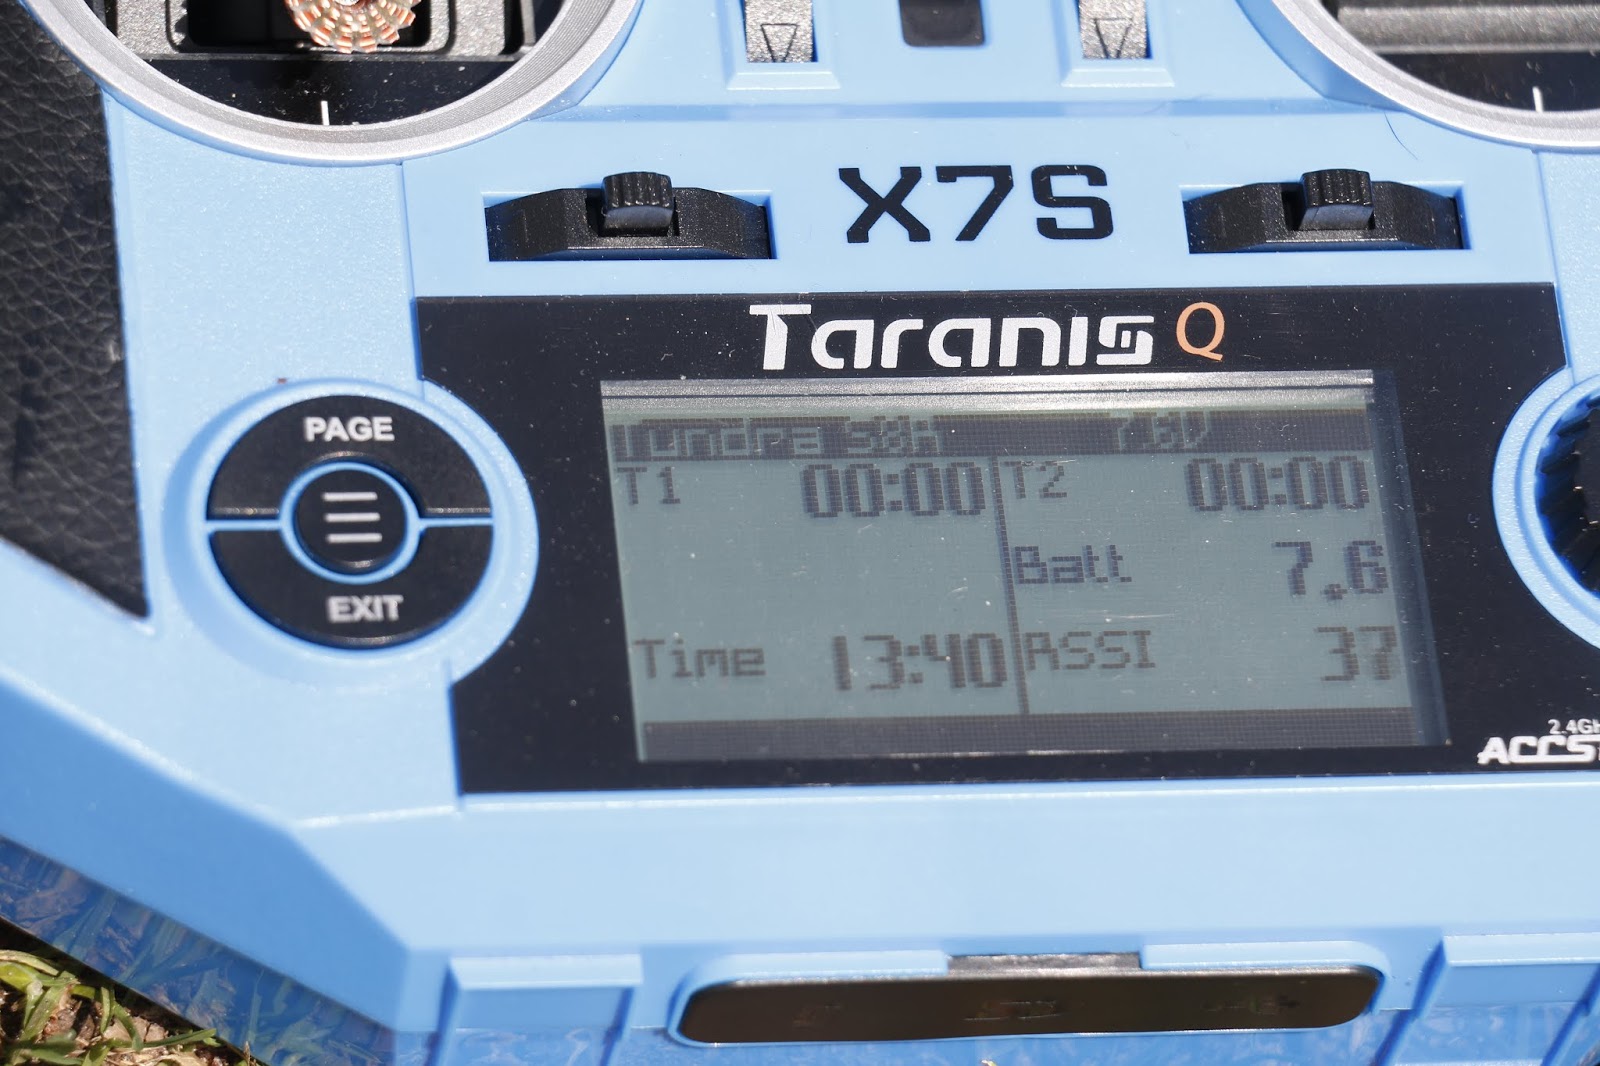
| "telemetry lost" |
When I put the transmitter dow on the floor to take the above picture, RSSI was down to 37, and the "Telemetry lost" message came from the transmitter.
 |
| Flying area |
Now, the area I usually fly in is 330m North-South by 85-200m West-East, so as long as I don't fly away over the trees, I should be OK. Nicely within line of sight, and standing in the middle of the clearing I have a margin of a factor 2 with the range.
 |
| Done for today |
So, we're all set for the maiden flight of Tundra 2. Now it's a matter of finding a weekend day with good weather, preferably no wind, and not a lot of people around at the clearing. It is not going to be easy to tick all those boxes, but safety first. So it may take a few weeks before I get to actually fly her. We'll see.
Stay tuned to hear if and when this maiden takes place!


Comments
Post a Comment